Mautic is a powerful open-source marketing tool that allows you to automate your online campaigns. In this post, I'll show you how to install Mautic and what to look out for.
Overview:
- 📒 What is Mautic?
- 🧭 How do I use Mautic on my site?
- 📦 Install Mautic Docker Image.
- ♻️ Docker Compose for Mautic 4
- 🚀 Sending mails via an external SMTP server
- ⌛ "Send immediately" vs "Queue"
- ✉️ Test SMTP settings
- 😵 Troubleshooting
- ❓ FAQ about the Mautic installation
What is Mautic?
Mautic is an acronym for "Marketing Automation" and is significantly developed by Acquia Inc, a company owned by Dries Buytaert, the developer of Drupal. Mautic is an open-source software for automating various online marketing processes. Mautic can be used to control newsletters, build landing pages, monitor social media channels and develop timed marketing campaigns.
How do I use Mautic on my site?
I mainly use Mautic to provide my newsletter forms in English and German. In addition, Mautic takes care of the double opt-in function: after a user registers for my newsletter, Mautic automatically sends a confirmation link and records the click on it.
I also use Mautic for small campaigns: Announcements of events or for documents that I provide free of charge in exchange for an email address. With Mautic, I can divide all my contacts into different segments and thus map areas of interest, for example. I can then serve these segments with different content via automatic campaigns.
Install Mautic Docker Image
In this tutorial, I assume an already existing Docker environment. I use the Nautic Docker Image because it is the easiest to maintain for me.
By the way, I use Portainer to manage all my Docker containers. Portainer provides a web-based graphical interface that allows me to launch new containers or entire stacks with a few clicks. In Portainer, a stack is a collection of multiple Docker containers that interact together. Portainer uses Docker Compose to map stacks.
Docker Compose for Mautic 4:
version: '2'

services:

  mauticdb:
    image: percona/percona-server:5.7
    container_name: mauticdb
    volumes:
      - mysql_data:/var/lib/mysql
    environment:
      - MYSQL_ROOT_PASSWORD=mypassword
    command:
      --character-set-server=utf8mb4 --collation-server=utf8mb4_general_ci
    networks:
      - mautic-net

  mautic:
    image: mautic/mautic:v4
    container_name: mautic
    links:
      - mauticdb:mysql
    depends_on:
      - mauticdb
    ports:
      - 80:80
    volumes:
      - mautic_data:/var/www/html
    environment:
      - MAUTIC_DB_HOST=mauticdb
      - MYSQL_PORT_3306_TCP=3306
      - MAUTIC_DB_USER=root
      - MAUTIC_DB_PASSWORD=mypassword
      - MAUTIC_DB_NAME=mautic
      - MAUTIC_RUN_CRON_JOBS=true
    networks:
      - mautic-net

volumes:
  mysql_data:
    driver: local
  mautic_data:
    driver: local
networks:
  mautic-net:
    driver: bridge
Place the docker-compose.yml file with this content on your Docker server and run the following command:
docker-compose up -d
Important: Assign a password for the database and replace "mypassword" in your version of the docker-compose.yml file.
Now you need a little patience: after starting the containers, it may take a small moment until the fresh Mautic environment is ready.
You can access the Mautic environment here:
http://localhost
or
http://DEINE-SERVER-IP
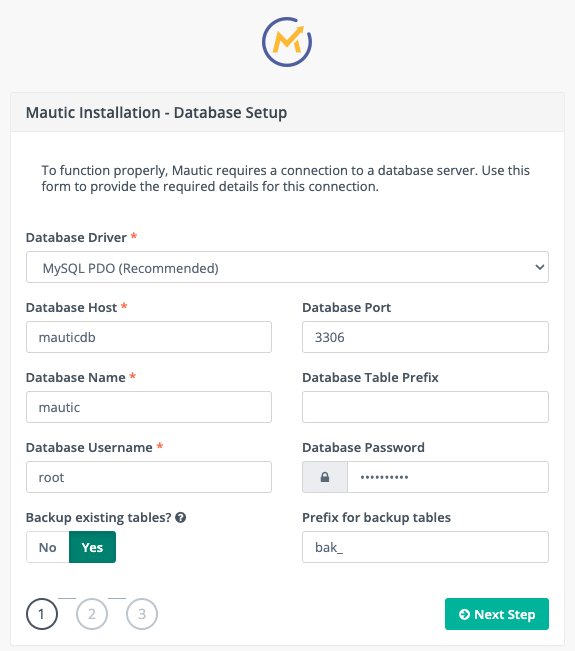
If everything worked, you should now see the installation process of Mautic. Here you will be prompted to enter the database data as you customized in docker-compose.yml:
Host: mauticdb
User: root
Database: mautic
Password: mypassword
Now Mautic will ask you for an administrative user. You can choose a username and password for the admin account. You also enter a first and last name and an email address here.
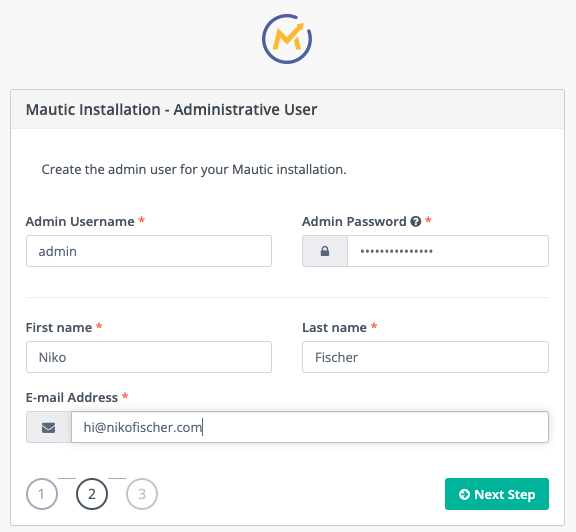
Important: If you trigger an email to your contacts from the administrative area of Mautic, then this data will be used as the sender. It is important that especially your email address matches the address of the email account from which you want to send all mails out of Mautic.
If this address is different, it can lead to mails either not being delivered or ending up in the recipient's spam folder.
It is best to enter the email address from which you want to send all mails later.
Note: Currently Mautic is not able to use several different SMTP servers. This could be useful use-cases: for example, if you want to use different sender addresses depending on the campaign.
I hope that Mautic will implement such a feature in the future. In the Mautic forum there are also a few users asking for such a feature, for example here.
Sending mails via an external SMTP server

In the next step you can decide how Mautic should send your mails. You have the choice between different transport methods.
Mautic can send your mails via the following ways:
- Amazon SES - API
- Amazon SES - SMTP
- Elastic Email
- Gmail
- Mailjet
- Mandrill
- Momentum
- Other SMTP Server
- Pepipost - SMTP
- Postmark
- Sendgrid - API
- Sendgrid - SMTP
- Sendmail
- Sparkpost
Important: This setting is crucial to ensure that your mails reach your readers and do not disappear unnoticed in the spam folder. The worst choice is to send via Sendmail. This is the basic mail transfer agent of your web server. It is extremely complex to configure and is considered outdated. In most cases the mails end up in the spam folder of the recipient.
You should at least choose to send via SMTP. Better results can be achieved by using a provider that specializes in sending newsletters, such as Mailjet, Postmark, Mandrill, etc. The configuration is usually very simple. Here, the configuration is usually also very simple.
❌ Disadvantage: The use of such newsletter providers costs money. Mostly, however, the fees are not very high. With Mailjet, sending 6,000 mails per month doesn't cost a cent.
I have chosen to send via SMTP through my mail server at IONOS and therefore select the option "Other SMTP Server".
But beware: most mail servers you use in conjunction with your hosting package limit the sending capacity.
Email bulk sending limit with IONOS:
Age of the contract / sending limit per day
- 0 - 7 days: 1500 recipients per day
- 8 - 14 days: 3000 recipients per day
- 15 - 30 days: 12000 recipients per day
- > 30 days: 16000 recipients per day
As you can see: the sending limits at IONOS depend on the age of the contract. Many email providers handle this similarly, because they assume that a sender who has been with them for a longer period of time and enjoys a certain level of trust is also correspondingly reliable and does not misuse their newsletter for spam, for example.
Google's Gmail also has corresponding sending limits:
- Maximum number of emails per day: 2,000 (500 for content in the test period).
- Maximum recipients per e-mail: 2,000 internal or 500 external (recipients outside your own organization).
"Send immediately" vs "Queue
You have the option to specify the send handler. You will find two options under the setting "Email handling":
- Send immediately
- Queue
Mautic gives you the choice how the mails should be sent. Either immediately ("send immediately") or via a queue ("Queue").
If you have only a few recipients in your contact database, I recommend to send the mails immediately. My experience is that up to 200 recipients you can send your mails immediately without any problems. From 200 recipients upwards it can come to longer loading times in the dispatch.
But be careful: Longer loading times are one thing. It can also be that the mail server is throttled and only allows 5 recipients per minute. This is the case with many providers. In this case you should always send via the queue.
If you send over the queue, then Mautic delays the mail dispatch and sends out only every 15 minutes a part of the mails.
After configuring the email settings, the installation is complete and Mautic welcomes you with the login screen.
Test SMTP settings
I recommend you to test your email settings. To do this, log into your admin account and click on the cogwheel in the upper right corner and select Configuration. Here you will find the menu item "Email Settings" on the left.
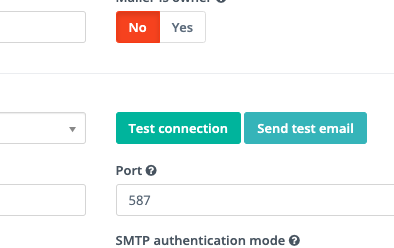
You will find two very helpful buttons here:
- Test connection
- Send test email
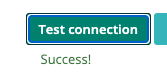 You can click both once. With "Test connection" Mautic tries to connect to the mail server in the background. If this connection is successful, Mautic acknowledges this with the message "Success!
With "Send test email" Mautic triggers a test email to the mail address of your admin account.
But be careful: depending on the selected shipping method "Send immediately" or "Queue it can take up to 15 minutes until the test mail arrives.
Troubleshooting
Address set in PathHeader does not comply with addr-spec of RFC 2822.
You want to send an email via Mautic and get an Error 500? In the log file you will find this entry:
"Address set in PathHeader does not comply with addr-spec of RFC 2822."
✅Solution: For me, this error occurs when Bounce wants to retrieve mails via IMAP. As soon as I deactivate the settings in the Mautic configuration under "Monitored Inbox Settings", it works again.
FAQ about the Mautic installation
Where can I see which Mautic version is installed?
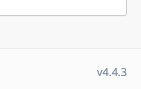 You can find the version number of your Mautic installation in the admin backend in the bottom right footer.
Why can I only install version 2 via the official Mautic Docker image?
Currently, in Docker Hub, the tag "latest" is reserved for version 2. If you want to install the latest version, just change the version from "latest" to "v4". Check out my Docker Compose YML file.
Example: image: mautic/mautic:v4
When sending the test email I get the message "Uh oh! I think I broke it. If I do it again, please report me to the system administrator".
This could be related to the monitoring of your inbox. Go to "Configuration" -> "Email settings" and remove the settings under "Monitored Inbox settings".
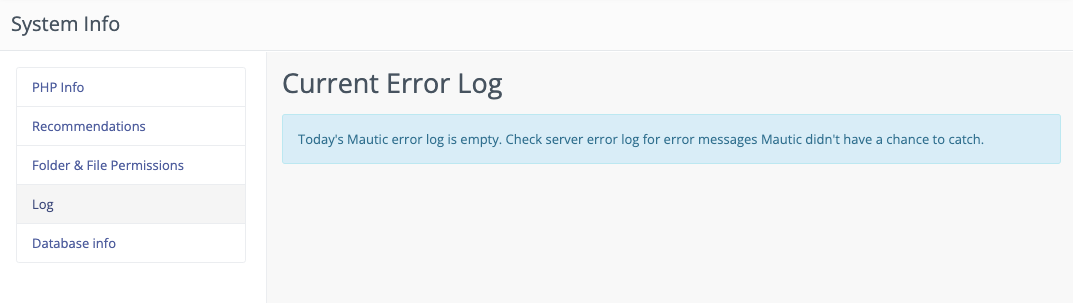
Where can I view the log files?
The easiest way is to click on the gear icon in the upper right corner and select the menu item "System Info". There you will find the menu item "Log".
Comments